
4/11/2022 – 4/24/2022
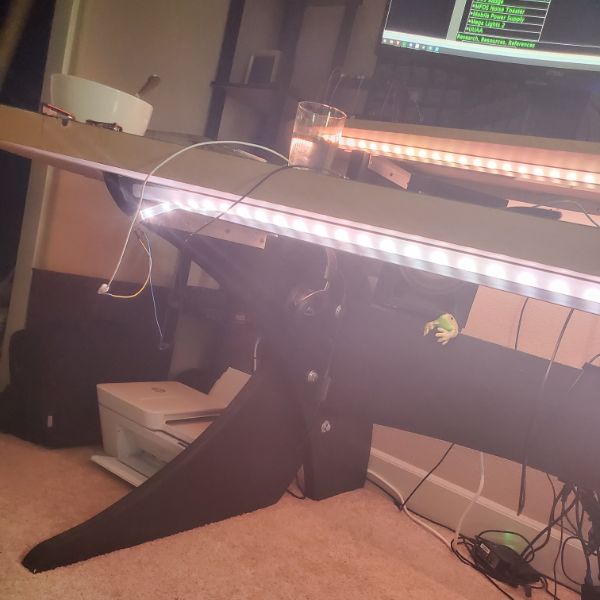
Summary: This round was kind of open-ended. Goal was to finish soldering together all the final switches and knobs for the Synth and get a more reasonable speaker for it. It works great now and isn’t painfully loud. Waiting to demo it until I get the case and front panel set up. Also set up a new file organization system for project files/reference docs/notes/CAD files/treesheets backups/etc. Not very sexy to show off but more useful for me moving forward as projects start expanding in scope. A lot of people don’t document, or don’t document very thoroughly, so, still trying to find the best system for me to balance between over and underdocumenting. Also reorganized the whole lab. Spring Cleaning Stuff.
Also looked into making a Youtube channel for this stuff. Still on the fence about it and how I would go about that, but animated/functional things like the lights and the synth are best represented via video, so I’m sitting on that for now. I doubt I’ll pass the Cringe Test anytime soon with my recordings.
Also did some brainstorming and research for future paths to take. Thinking about trying to improve my software skills more seriously, since that’s becoming the main thing holding back the complexity of my projects. Also, I think not having a good Github to show off is pretty lame.
Spent some time reading up on Serial Communication Protocols, formatting the Pi, setting up MQTT and Node-RED again and reading ESP32 documentation so I can move forward with replacing the arduino in the lightsbox with an ESP so I can have more control over the lights, wirelessly. The new printer should show up sometime in the second week of [I], I’m hoping. I’m guessing the next two weeks will also be a little slow and scatterbrained while I continue waiting. More research and reading and studying and less building and picture taking, so it’s gonna be boring for a bit.

Hyena
Resources List
Monty Choy Hardware Interview Questions
1
Digital Design HQ Discord #Resource Dump
2
EEVBlog Power Supply Design Series
3
Intel FPGA Technical Trainings
3
Digikey intro to RTOS
4
Digikey intro to FPGA
4
Digikey intro to KiCad
4
FesZ intro to LTSpice
4
Tutorial Sites
Asicworld
ZipCPU
Nandland
cplusplus
Practice Problems for Hardware Engineers.pdf
FPGA4Fun
Nandgame
HDLBits
EDAPlayground
FPGA4Student
Bitsolver
5
Art of Electronics
5
Automate Boring Stuff with Python
6
C++ for Embedded Systems
6
3D Printing Dive
7
FreeCAD Tutorials
7
Timeline
Original Plan
New Plan
January
A
3D Printer
B
3D Printer
A
3D Printer
B
3D Printer
February
C
Power Supply
D
Power Supply
C
KiCAD/LTSpice
D
KiCAD/LTSpice of Synth
March
E
Power Supply
F
Interview Questions
E
Breadboard of Synth
F
PCB Routing for Synth
April
G
Interview Questions
H
Intel/Quartus
G
LED Strip Installation
H
LED Strip Backend
May
I
Tutorial Sites
J
Tutorial Sites
I
Power Supply
J
Power Supply
June
K
FPGA Projects
L
FPGA Projects
K
Interview Questions
L
Interview Questions
Interview Questions
4 weeks
Intel FPGA
2 weeks
FPGA Projects
4 weeks
Power Supply
6 weeks
3D Printer
4 weeks
C/C++/Python
Verilog
Art of Electronics
4 hr/day
4 hr/day
2.5 pages/hr
5 pages/hr
24 min/page
12 min/page
10 pages/day
20 pages/day
100 pages/sprint
200 pages/sprint
200 pages/month
400 pages/month
6 Months?
3 Months?
(3/16) Mom said my present should be arriving today. Bub asked me how much railing I need so I’m guessing she bought me my LEDs. Which is pretty exciting.
I’m thinking my lab sequence will be
Synth PCB Layout, Order
1 week (this week)
Research how to install strips
1 week
Install Strips, set up backend
1 week
Assemble Synth PCB, Validate
1 week
Start Power Supply Design Series
I can tell I’m kind of avoiding the Power Supply Project
Synth
Order PCB
Solder
Model Housing
Design Front Panel
Polish
Mega Lights
Dive in NeoPixelBus Library
Some OOP?
VSCode/PlatformIO/Github Setup
Hardware Mounting on Desk
Setting up Breadnet IV
NodeRED, MQTT, Tkinter, etc.
Power Supply
Interview Questions
Art of Electronics
Map Interview Questions to Page numbers in AoE
Automate Boring Stuff with Python
Design Christmas Present
Breadnet
Resources
https://wiki.beyondlogic.org/index.php?title=Main_Page
https://docs.espressif.com/projects/esp-idf/en/latest/esp32/index.html#
https://pypi.org/project/paho-mqtt/
https://www.npmjs.com/package/paho-mqtt
https://mntolia.com/mqtt-python-with-paho-mqtt-client/
https://mosquitto.org/documentation/
Next Steps
Connect ESP32 to WiFi
https://www.dfrobot.com/blog-948.html
Connect an ESP32 to the mqtt and run a brief blink every time it receives a message
Brain is gassed out. Picking MQTT tomorrow
Configure the ESP32 to only run a blink if the string matches the expectation
Configure the ESP32 to drive Neopixels
Insert the ESP32 into the lightsbox
Set up a Node-RED flow to ping the ESP32 to toggle all the pixels on or off
from there, move onto priority interrupts
Notes
Time to set up Breadnet again!
I’m thinking this time I’ll put it next to the lightsbox, so it can take the USB tap that controls mouse and keyboard. I’ve got the miniHDMI that I can plug into the left monitor. That way I can switch to the Pi at a moments notice, just like my work laptop
I’m pretty sure it’s still on HASS, so I’ll have to pull out the SD card and flash it for linux first
was rotom, then hutao, now breadboy
If I’m gonna make anything useful, I’m probably going to have to take time and dive into each element separately
MQTT
Mosquitto
Node-RED
JSON
ESP32
SK6812
Setup
Pi Flash
Set up a miku wallpaper, made sure everything was up to date
Installed TreeSheets on the Pi, new move!
Unfortunately, I can’t get dropbox on the Pi because it uses an ARM processor which dropbox app doesn’t support, so I can’t sync the lab notebook onto the pi without issue
Installed Node-RED and Mosquitto and set them both up
Defined users for eein and angel for node red
Mosquitto now requires a .conf file to allow any external connections, so I had to write that.
MQTT – Mosquitto
requires a .conf
This will have to get modified over time to increase sophistication and security
MQTT Server (local)
10.0.0.25:1616
Mosquitto version 2.0.11 using MQTT v5
The basic format of a MQTT message
I converted msg.payload into a string and then printed it. It looks like every MQTT message comes in the format
b’message’
Where there’s a b at the front, and then quotations around the message itself
Node-RED
Now has a “Projects” functionality that can sync with github
No Idea what’s going on there
Node-RED can also connect with the new MQTT v5
Python
Using sample code from the paho.mqtt library to connect to the server
Ran in VS Code. Python IDLE didn’t work right away, and it’s also just not as usable
Here’s the script:
import paho.mqtt.client as mqtt
# The callback for when the client receives a CONNACK response from the server.
def on_connect(client, userdata, flags, rc):
print(“Connected with result code “+str(rc))
# Subscribing in on_connect() means that if we lose the connection and
# reconnect then subscriptions will be renewed.
client.subscribe(“corn”)
# The callback for when a PUBLISH message is received from the server.
def on_message(client, userdata, msg):
message = str(msg.payload)
print(msg.topic+”:::”+message)
print(len(message))
print(message[0])
client = mqtt.Client(client_id=”vscode”)
client.on_connect = on_connect
client.on_message = on_message
client.connect(“10.0.0.25”, 1616, 60)
# Blocking call that processes network traffic, dispatches callbacks and
# handles reconnecting.
# Other loop*() functions are available that give a threaded interface and a
# manual interface.
client.loop_forever()
MQTT Dash (mobile)
connects just fine
MQTTX – Desktop monitoring
Can submit JSON payloads
Research
Serial Communication (UART,SPI,I2C,USB)
USB
How does it work
USB2.0 cable has 4 wires
Power 5V
Ground
+Data
-Data
Differential Pair to ensure signal integrity
Master has many responsbilities
Hardware
Detecting USB Connections
Providing Electrical Power
Controlling Data Transfer
Software
Handling Connectivity
Configuring multiple USB devices
Running the devices’ drivers
Managing Power and Bandwidth
USB TYPE A is the MASTER’s PLUG
This is what connects to the host
This is where the power and data come from
All other USB types are SLAVE PLUGs
They do not send power nor data
You have never seen an A-A USB cable
USBs are easy from the user perspective
USB can be very difficult from a Developer Perspective
Terms
USB
Host – Master
Device – Only transmits when the host has an outstanding transaction
OTG – on the go, indicates some limited Host Functionality
Hub – Expands the host’s ports, and acts as a signal repeater
Frame – Time division of the USB bus. Is the basis for all USB communication
Packet – Bundle of data for transmission
A Frame is made up of multiple Packets
Enumeration – The handshake process that occurs every time a device is connected to a host.
The windows USB noise indicates the START of the enumeration process.
The device showing up in device manager with a success status indicates the END of the enumeration process
Descriptor – a structure in the connected device’s firmware that describes
All the capabilities of the device
What interfaces it supports
What type of device it is
etc.
Structure
HOST
HOST’s ROOT HUB
DEVICE
DEVICE
HOST’s extra HUB
DEVICE
DEVICE
Bus Organization
Since the host is the master of all traffic, it’s the reference point
IN TRANFERS – from the device INTO the host
OUT TRANSFERS – from the host OUT TO the device
Speeds
USB Types have different speeds. These speeds determine Frame Timing in data transfer
Low Speed
USB 1.0
1.5 Mbps
Full Speed
USB 1.1
12 Mbps
High Speed
USB 2.0
480 Mbps
NROOOM
USB 3.0
5 Gbps
Transfer Types
Control Signals
Best effort delivery
Used for transfer command and status operations like enumeration
Bulk
Mass Storage Devices
Guaranteed Data Delivery
High Data Throughput
No Latency Promise – Lowest Bus Priority
Interrupt
Human Interface Devices HIDs
Mouse and Keyboard
Low data throughput
64 bytes per millisecond
Guaranteed Latency
HIGHEST bus priority
Isochronous
Guaranteed Latency
High Data Throughput
No Guaranteed Delivery – packets can be lost without consequence
Frames
Frames provide a data structure for the bus Below is an example frame with 2 interrupt devices and 2 bulk devices
1 millisecond frame
Start of Frame – SOF
Control or Data Packets
INTERRUPT 1
INTERRUPT 2
Control Packet
BULK 1
BULK 1
BULK 1
BULK 2
BULK 2
BULK 2
BULK 2
BULK 2
UNUSED
UNUSED
UNUSED
UNUSED
If a device isn’t ready to talk when the master addresses it, it can lose it’s slot in the frame. Stay on the bus
Certification
USB Logo certification refers to certified hardware.
Ran by USB.org
USB Device Drivers can also be certified
Tips
UART is usually a steady stream of information
A CP210x device can convert USB to UART, but the timing might change
The throughput of each device may be affected if there are too many Bulk or Isochronous types connected to one host
If an Interrupt device misses its slot because it wasn’t ready when the host called for it, it will have to wait until next frame
USB Topology
USB 3.0
Dual bus architecture
Consists of a 2.0 and a 3.0 host, with a bus for each, simultaneously
USB 3.0 has the same 5V Supply and Ground return
So a USB3.0 hub can take both 2.0 and 3.0 devices
But the big difference, is it has three fully differential data pairs
The original D+/- data line
and then 2 Superspeed channels
SSTx+
SSTx-
SSRx+
SSRx-
in 3.0 Hubs route packets only to the corresponding device
3.0 Hubs also help with power management
Host
There can only ever be one Host on a given USB bus
All hosts must have a root hub integrated within the system
The host is the brains of the hub system, and has a lot of responsibility
Responsible for transaction initiation and flow control
The ON THE GO standard allows slave devices to initiate transactions
Devices
devices are responsible for maintaining protocol and timing. sending and receiving packets, etc.
Compound Device
combo of a hub and a device
USB Power Class
Bus-Powered
draws all operational power from the upstream facing port
Defaults to 100mA current draw
Can Negotiate with the host for up to 500mA
Hubs are required to provide 100mA to all downstream ports as protocol
Self-Powered
Draws its power from a non-bus supply
Can still draw up to 100mA from the upstream port
3.0
supports all USB2.0 power classes
Increases in power limits
50% in default
150mA
80% in negotiated
900mA
New Low Power States
Idle, Sleep, and Suspend
Lower Power Overall
USB Address
1 host, many slave addresses
There are 127 Unique addresses per USB host
Host is responsible for assignment. The devices do not have addresses by default and must wait to be assigned one by the host
USB Endpoints
In/Out directionality is always from the Host’s point of view
Endpoints are a logical structure repsenting the source and sink of data transactions between host and device
IN Endpoints and OUT Endpoints
Devices can support any combination of IO
ENDPOINT_0 In and Out are reserved for control signals like enumeration in all devices
Pipes
a direct logical connection between a host and one or more endpoints
Message Pipe
Stream Pipe
Enumeration
Process by which host interrogates all devices for their attributes and assigns them an address
Enumeration must be complete before the host can access thed evice
USB Requests
Requests define the mechanisms for host/device communication
Standard Requests are agnostic to actual device functionality
https://beyondlogic.org/usbnutshell/usb6.shtml#StandardDeviceRequests
There are a list of USB Standard Device Requests
bmRequestType bRequest wValue wIndex wLength Data
1000 0000b GET_STATUS (0x00) Zero Zero Two Device Status
0000 0000b CLEAR_FEATURE (0x01) Feature Selector Zero Zero None
0000 0000b SET_FEATURE (0x03) Feature Selector Zero Zero None
0000 0000b SET_ADDRESS (0x05) Device Address Zero Zero None
1000 0000b GET_DESCRIPTOR (0x06) Descriptor Type & Index Zero or Language ID Descriptor Length Descriptor
0000 0000b SET_DESCRIPTOR (0x07) Descriptor Type & Index Zero or Language ID Descriptor Length Descriptor
1000 0000b GET_CONFIGURATION (0x08) Zero Zero 1 Configuration Value
0000 0000b SET_CONFIGURATION (0x09) Configuration Value Zero Zero None
USB Packets
Transfer types are defined by the specific sequence of packets
Four types of packets
Token Packet
Used to describe what type of activity the host is requested
Data Packet
Contains the non-protocol payload, or may just be empty
Handshake Packet
Similar to acknowledge in I2c
Special Packet
Rarely used, special cases only
USB Packet Fields
Sync
Packet Identifier
Address
Endpoint
Cyclic Redundancy Check
End of Packet
USB Device Classes
group of devices with similar attributes or services
Each class has it’s own unique requirements
eg. Audio Class: Speaker, Microphone, etc.
USB Device Classes are defined external to the official USB Documentation
USB Schematic Considerations
The speed of the differential pairs are determined by the pullup resistance on the D+/- lines
Low Speed
1.5k R from VBus to D-
Full Speed
1.5k R from VBUS to D+
High Speed
1.5k R from VBUS to D+*
* High Speed device must initialize as Full Speed then get the host to acknowledge it as High Speed
USB 3.0 super speed devices must have the ability to dynamically attach/detach the pullup resistors
OTG devices have a 5th, ID pin
determined by resistance, not logic level
leave floating for device
tie directly to ground <10R trace for host mode
USB Layout Considerations
Typical high speed ringing, distortion, mismatched impedance
All normal signal integrity stuff for Superspeed USB functionality
Constant trace impedance is key for signal integrity
Some real tips on signal integrity tracing here:
https://youtu.be/_n1zaNr_5-Y?t=1458
Intel provides a Intel High Speed USB Platform Design Guidelines
USB Device Offerings
Dedicated USB Controller chips, with dedicated USB serial interface engines
8bit
TUSB3200
16bit
32bit
Universal Serial Bus Explained
Further Reading: USB COMPLETE – JAN AXELSON
http://janaxelson.com/usbc.htm
https://youtu.be/_n1zaNr_5-Y
https://youtu.be/5S6ZPmtPzRA
https://youtu.be/cgKRQsGSk-c
Design started in ’93
Computers used to SUCK
Most PCs had 2 Serial Ports (VGA Style)
The 7 Tech Companies Conspiared to make a USB
DEC
NEC
IBM
COMPAQ
Intel
Nortel
Microsoft
Objective
Universal
Fast
Multifunctional
1995 – USB 1.0
Plug and play, hotswappable, super easy
If the PC doesn’t recognize the device, it will install a driver for it
FTDI
FUTURE TECHNOLOGY DEVICES INTERNATIONAL
A Scottish Semiconductor Device Company specializing in Universal Serial Bus Technology
They make adapters that convert USB type data to UART type data
6 pins: 2 power (VCC, GND) and 4 data (CTS, TX, RX, DTR)
Transmit, Receive, Data Line Ready, Clear to Receive
Three Types of Serial Communication Protocols:
https://youtu.be/IyGwvGzrqp8
UART
Asynchronous – doesn’t use a clock
UART
Synchronous – uses a clock pulse to time pulses containing data
Asynchronous – doesn’t use a clock
One wire for Tx/Rx, One wire for Ground.
How does it know when to start and stop?
The transmitter and receiver need to be on the same page, configured in the same way
This means they should both be expecting the same Tranmission Speed (baudrate), the same Data Length, and the same START and STOP bits
UART usually uses a 1-cycle LOW pulse to indicate the start bit. before and after data, the signal is held at HIGH
UART is limited in length to about 15m
RS-232 and CAM BUS can travel long distances
UART has an acknowledge pin, but I2C and SPI don’t. This means I2C and SPI can transmit data even if there isn’t a receiver/slave connected
RS-232
RS-232 is just another type of UART
Every computer uses UART
On a UART Chip, you might see these pins that act as flags
DTR – Data Terminal Ready
CTS – Clear to Receive
Most devices have both Tx and Rx so they can both send and receive. But if data is only going one way you only need one wire
I2C
Inter-Integrated Circuit
Synchronous type, requires a clock pin
SDA – Serial Data Line
SCL – Serial Clock Line
Still need to specify the Data length and Frequency
usually up to 400Kb/s & 15-16 bits
Designates a Master Device and a Slave Device
Communication is still one-to-one, but can address different slave/receiver devices
The Master sends the Address Byte first, then the Data Byte
Only the Addressed Slave will store the Data into its buffer
I2C is limited in length to about 1m
1. I2C is Half-Duplex (not Simplex)
2. SPI is Full Duplex
3. In I2C, we can configure the peripheral to both the modes – Acknowledge and No Acknowledge
SPI
Serial Peripheral Interface
Also Synchronous
Five Wires Total
SCLK – Clock
MOSI – Master.output, Slave.input
MISO – Master.input, Slave.output
SS_ – Chip Select
Ground
Also Uses One Master and multiple Slaves
SPI requires a unique wire for each chip select on each slave. You can’t use an address bus like you can with I2C.
The consequences of this are that I2C is the simpler protocol, but SPI allows for FULL DUPLEX – meaning both the master and slave can be sending data at the same time
SPI also goes faster and consumes less power than I2C
SPI is limited in length to about 20cm
There are many more types, here’s a bigger list
SBUS
JTAG
I2C
SPI
USB
PPM
UART
CAN
MIDI
RS-232
UART
how does UART work??? (explained clearly)
https://youtu.be/V6m2skVlsQI
Universal Asynchronous Receiver/Transmitter
Two Devices communicate data both ways
Hardwire communication
3 Wires
GROUND
Tx
Transmission
Rx
Reception
Device 1’s Tx line plugs into Device 2’s Rx port
So, 1 wire for ground, and 1 wire for 1->2 communication, and 1 more wire for 2->1 communication
Transmission of data via binary signals
When you communicate a signal like 01001111, you keep the signal up at HIGH for four cycles, you don’t bring it down and back up again four times
Baudrate
bitrate
9600 Baudrate = 9600 bit/s
Receiving device checks the transmitting pin for a LOW or HIGH signal
Once every 1/9600th of a second
104uS
Serial Communication, as compared to Parallel Communication (8 wires, 1 for each bit in the byte)
More Time, or More Wires
Misc Questions
What’s the difference between Python, CircuitPython, Embedded Python, Python Embdedded, and Micropython?
How to do OTA updates on ESP32?
XOD – Visual Programming for Microcontrollers
MQTT
Mosquitto
Node-RED
JSON
ESP32
Espressif Documentation
Forum
https://esp32.com/
Github for doc
https://github.com/espressif/esp-idf/tree/5bb59b00e72f8f91eb24d8c65bf9a7ea2b8a4f5f
ESP32 Libraries
https://docs.espressif.com/projects/esp-idf/en/latest/esp32/libraries-and-frameworks/cloud-frameworks.html
Documentation
https://docs.espressif.com/projects/esp-idf/en/latest/esp32/index.html#
FAQ
https://docs.espressif.com/projects/espressif-esp-faq/en/latest/
Get Started
ESP-IDF – Espressif IT Development Framework
ESP32 is a SoC with the following features
WiFi 2.4 GHz Band
Bluetooth
Dual High Performance 32-bit LX6 CPU Cores
Ultra Low Power co-processor
Multiple Peripherals
Design
Made with 40nm tech
Designed to keep up with efficient power usage, compact design, security, high performance, and reliability
Equipment
ESP32 Board
USB Cable
Computer
List of Official ESP32 Development Boards
ESP32-DevKitC
ESP-WROVER-KIT
ESP32-PICO-KIT
ESP32-Ethernet-Kit
ESP32-DevKit-S(-R)
ESP32-PICO-KIT-1
ESP32-PICO-DevKitM-2
ESP32-DevKitM-1
List of Different ESP32 Modules (the chip itself)
ESP32-WROOM-DA
ESP32-WROOM-32E
ESP32-WROOM-32UE
ESP32-WROOM-32D
ESP32-WROOM-32U
ESP32-SOLO-1
ESP32-WROVER-E
ESP32-WROVER-IE
Each of these DevBoards has a different form factor, PCB, peripherals, etc. But use the ESP32 as it’s main chip. They’re pretty distinct in terms of size and shape
There is an ESP Product Selector
https://products.espressif.com/#/product-selector?names=
The ones I have are ESP32-DevKitC V4
The ones I have have the ESP-WROOM-32 Chip
the WROVER types are bigger
Software
ToolChain – compiles code for ESP32
Toolchain includes Python, Git, cross-compilers, CMake, and Ninja build tools
Embedded Python, OpenOCD (On Chip Debugger)
https://openocd.org/pages/documentation.html
Build tools: CMake & Ninja 0 build a full “Application” for ESP32
ESP-IDF – contains API for ESP32 and scripts to operate ToolChain
VSCode Extension for this specifically
Features
Setup, will help you to quickly install ESP-IDF and its relevant toolchain with just a few clicks.
Build, with one-click build and multi-target build, you can easily build and deploy your applications.
Flash, with both UART and JTAG flash out-of-the-box.
Monitoring, comes with a built-in terminal, you can trigger IDF Monitor Commands from within VS Code as you are used to in traditional terminals.
Debugging, with out-of-the-box hardware debugging.
GUI Menu Config, provides a simplified UI for configuring your chip.
App & Heap Tracing, provides support for collecting traces from your application, and a simplified UI for analyzing them.
System View Tracing Viewer, aims to read and display the .svdat files into the trace UI (we also support multiple core tracing views).
IDF Size Analysis Overview presents a UI for binary size analysis.
Rainmaker Cloud, inbuilt Rainmaker Cloud support where you can edit/read the state of your connected IoT devices easily. For more information see the ESP Rainmaker page.
Code Coverage, inbuilt code coverage support with color highlights showing which lines have been covered. The HTML report renders directly inside the IDE.
Anatomy
Every ESP32 DevBoard will have the following
ESP32 SoC
Reset Button
USB-to-UART Bridge Chip
MicroUSB port
5V Power On LED
I/O Pins
Note
The pins D0, D1, D2, D3, CMD and CLK are used internally for communication between ESP32 and SPI flash memory. They are grouped on both sides near the USB connector. Avoid using these pins, as it may disrupt access to the SPI flash memory / SPI RAM.
The pins GPIO16 and GPIO17 are available for use only on the boards with the modules ESP32-WROOM and ESP32-SOLO-1. The boards with ESP32-WROVER modules have the pins reserved for internal use.
Power Supplying
There are three MUTUALLY EXCLUSIVE ways to power the board. One and only one otherwise the board and/or the power supply can be damaged
USB Cable
5V/GND
3.3V/GND
SK6812
Q2 Planning / Timeline
H->N
April
H
May
I
J
June
K
L
July
M
Objectives?
Projects?
Skills?
Milestones?
Systemic Changes? Rough Sketch. Plenty to Do. Plenty of room for content creation here
More Financial Tracking
Lab Ledger? for general equipment purchases
Every project has a BOM?
Get over Coding Discomfort
Start producing Online Content/Presence to connect and share with others
Ch1-4 of AoE complete
projects in C, C++, and Python
OOP
No real reason to learn Unity other than wanting to make Blasteroids 3
A Useful Breadnet
Some sort of Mechanical Design bootcamp
MATLAB, LinAlg, Control Systems
Crickets…
Urbit?
Concrete Next Steps
Read AoE
Set up Prusa Printer
Finish Synth
Sprint Objectives
Week 2
Arbitrary Control of 1 LED, in Arduino IDE to get moving
Finish Noting Ch1 AoE
Get recording setup together and plan some videos
Sony Vegas Tutorials
Cricket Ground Beef
Finish Ch1 of AoE
finished reading, just need to enter the notes
Start Ch2 of AoE
started reading, having a b l a s t
Organize documentation
Lab Ledger, setting up Budget
Migrating files to Dropbox, setting up backup schedule
Complete, new system in place, a little overbearing but very organized and secure
Second Brain mindset
Set up VS Code
Set up VS Code
Set up Python
Re-ran some old Python Scripts I wrote last year
Configured a bunch of stuff I don’t care about
Tried to set up PlatformIO
Remembered PlatformIO is a pain in the ass and a half
Bookmarked some tutorials, and will get back to it later
Once done with those tutorials, will move on to editing the Mega Lights Code
The example code I’m running only uses the Adafruit Neopixel Library, so as long as I become adept with that one library I shouldn’t have any issues across different brands of strips, as well.
Trying so hard to be organized orz
Set up Github
Cleaned up github repos & the twitter it links to
Thinking about modeling final project documentation after this github project
And then copy pasting that into the eein.info project page when it’s done
https://github.com/tjhorner/bizcard
Arbitary control of 1 LED
It seems like the example code I have has everything I need to really manipulate these lights, if I take the time to really break it apart. I’ll have to research how the Adafruit Neopixel library works in closer detail to figure this out though
Maybe some tutorials on a photo editor & video editor
i have to choose between gimp and photoshop once and for all
and i have to choose between vegas and adobe once and for all
I also should buy a phone tripod if I’m gonna do this
Youtube Channel?
set up a sleeper youtube channel
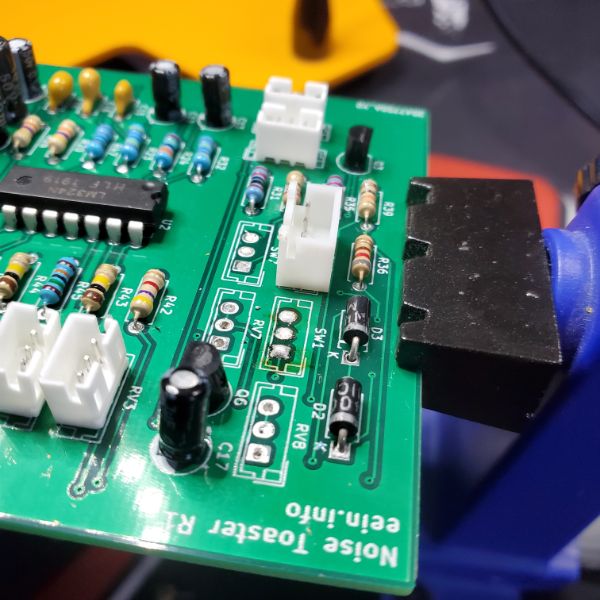
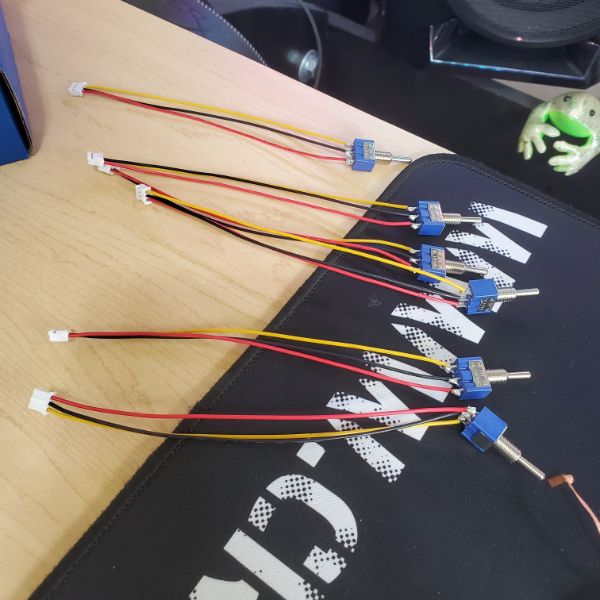
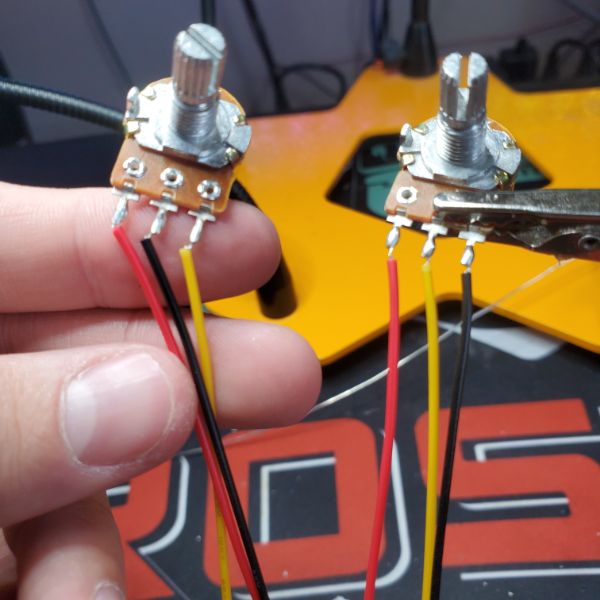
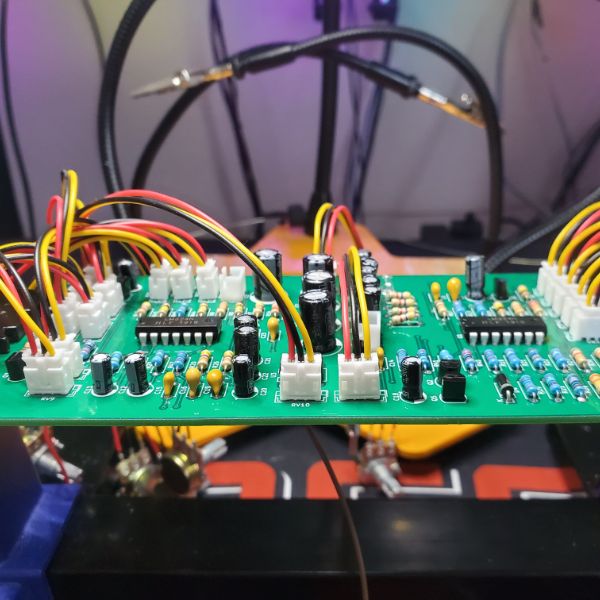
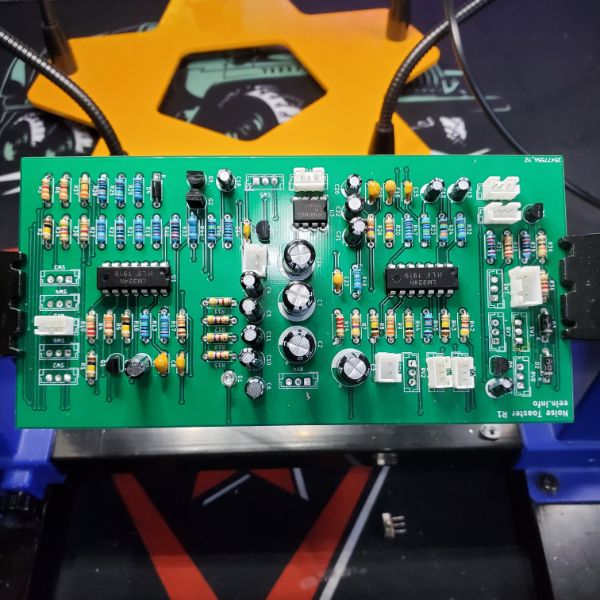
Finish Soldering Synth
Just a few switches and buttons to take care of.
I also have some speakers arriving today
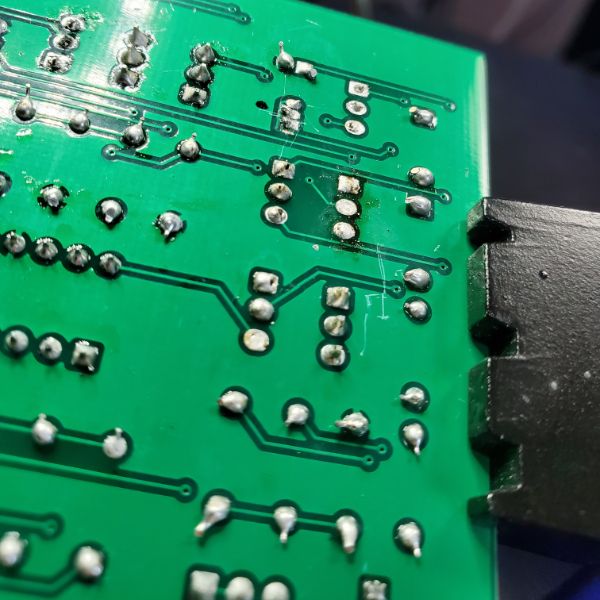
Attempted Desoldering 3 pin junctions and it was a little more complicated than 2 pin components
I tried using the soldering iron and the copper mesh but that didn’t work, so I decided to bring out the hot air gun
The hot air gun didn’t consistently soften solder joints until I turned the temp to 400C and kept the airflow at 4. some flux did burn into the board a little bit, and the board itself and the board holder both got too hot to touch in some areas.
After some intense focus, I noticed that, the solder never liquifies in the way it does with an iron, it just gets softer and softer as it heats until the component will slide out, but it doesn’t seem to ever give a visual cue of the transition point. Maybe I need hotter air or something, I was trying to be conservative with it
I was able to get every pot and switch off the board
The screwdriver turn pots were damaged in the process. And by that I mean, by the time the hot air had melted the solder enough to extract them, the plastic disc responsible for turning would squish with very little force. I think only a single pot made it out in a condition approaching workable. Either way, I threw out all the pots and switches I desoldered. No chance I’ll use those again.
I should probably stock my lab with that concept in mind, which components are worth reusing and which I’ll throw away after one use. That can go into the prototype component selection philosophy as well
In switching out the hot air gun nozzle to a bigger one, I found a Simply Superior Solder Sucker in the box, and started using that one instead. I made quick work of about 30 holes. I thought about whether it would be quicker to desolder and resolder a bunch of things, or just put together a new board. Now that I can desolder relatively effectively, keeping the same board is definitely faster. I’m looking forward to buying new equipment
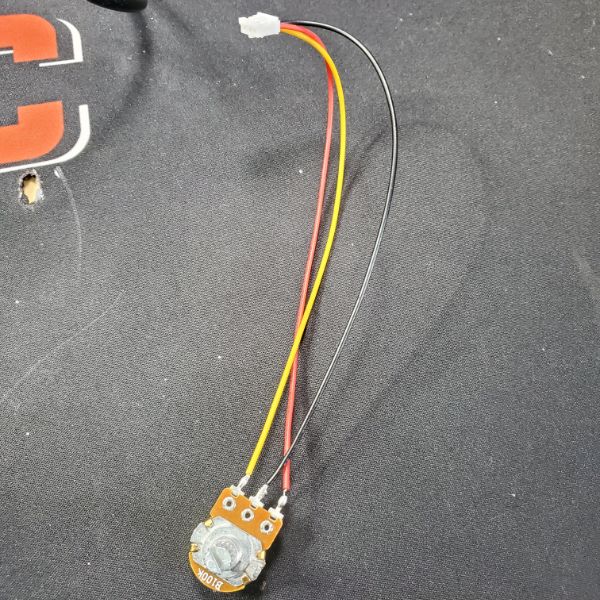
While soldering together the switches and pots for the rest of the ports, I did notice that some pots were miswired, so I fixed that. I also soldered together the button for the AREG.
Ultimately, after putting everything together, every last knob and switch worked exactly as intended EXCEPT the VCF Mod Depth/Source. I have no idea what their function is supposed to sound like and honestly I don’t think I’m missing out that much.
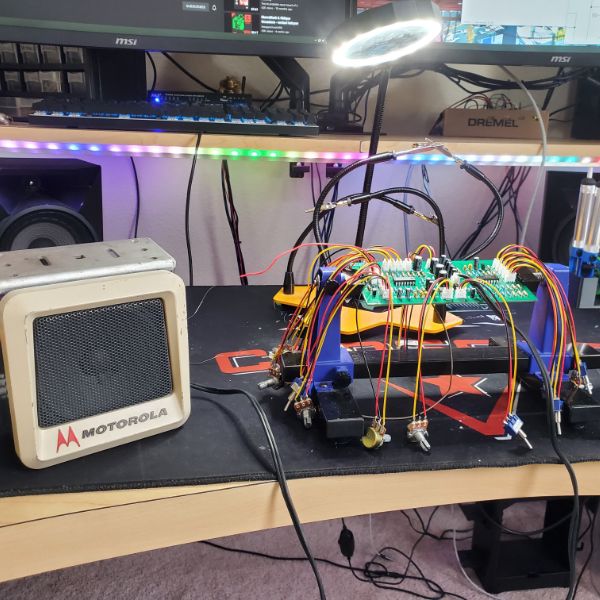
The synth works perfectly with all these switches in place and I was able to creatively construct some new sounds I haven’t been able to before due to inaccessible or inconsistent equipment. I’m looking forward to putting this one up in a box. It can sit on my shelf for now until the Prusa shows up.
I’ll have to test it with the tiny new speakers I ordered when they get here, because I’m still having the issue of, I need the volume pot turned to an extremely low value, and I only have a meaningful operating range of like 1-8% “max volume”
I’m guesing a new, quieter speaker will let me access more of the range.
Brainstorming
Try bed adhesives for the printer, either with PEI or on bare glass
Photoshop?
GIMP?
Vegas? Premiere Pro?
Vlog/Blog Updates? Like, quarterly updates
Project Recap Videos
Sprint Recap Videos
Book/Video Essays
Do I need to research how to youtube?
Make new username/socials?
fishPointer, eein-info
Discord Server?
At that point I’m just creating a whole online Presence
I’ll never have a cool name like Styropyro
C
C++
Python
MATLAB, Simulink
Visual Basic (for work)
Automate Boring Stuff with Python
JSON/Node-RED
Future Project Ideas
Left/Right Snap Neural Net
FPV Autonomous Drone
How Hard Can You Blow?
Soldering Station
Blasteroids 3
LED Cube
Build an Arduino
Nice Clock Ahmed
Weather Station
ESP32 RTOS Project
Game Controller
Attendant Drone
Danger Laser Rover
Bluetooth Plasma Speaker
Thereminator 2
Breadnet 4
Book Scour
Books on EE
The Art of Electronics
Practical Electronics for Inventors
Embedded C: Embedded C (Michael Pont)
High Speed Digital Design: A Handbook of Black Magic
High Speed Signal Propagation: Advanced Black Magic
Beginner’s Guide to Reading Schematics
Zen of Analog Circuit Design
Books on Programming
https://www.codespot.org/best-books-for-programmers/
Top 10
Donald Knuth: The Art of Computer Programming
Clean Code: A Handbook of Agile Software Craftsmanship
The Pragmatic Programmer: your journey to mastery
Code Complete: A Practical Handbook of Software Construction
Refactoring: Improving the Design of Existing Code
Design Patterns: Elements of Reusable Object-Oriented Software
Mythical Man-Month, The: Essays on Software Engineering
C Programming Language
Cracking the Coding Interview: 150 Programming Questions and Solutions
Introduction to Algorithms
Soft Skills: The software developer’s life manual
The Soul of A New Machine
Where Wizards Stay Up Late: The Origins Of The Internet
But How Do It Know? — The Basic Principles of Computers for Everyone
Fire in the Valley: The Birth and Death of the Personal Computer
Books on Engineering, General
Peopleware: Productive Projects and Teams
High Output Management
Getting Things Done: The Art of Stress-Free Productivity
The Design of Everyday Things
The Existential Pleasures of Engineering
Skunk Works: A Personal Memoir of My Years at Lockheed
Engineering and the Mind’s Eye
Unwritten Laws of Engineering
Youtube
Spent like an entire hour just logging into google accounts, managing youtube channels, and then trying to make one on iantralmer@gmail.com for eein.info
You can’t use periods in youtube names, so it’s eein-info now
Resources
How to Youtube
https://youtu.be/EMvoTXoRE4A
Write, Record, Animate, Edit, Upload
Write everything down, then trim and decide what’s worth talking about
Record in Audacity, some techniques on background noise cancellation and then
Levelator? for equalizing loudness
Blue Yeti mic with a pop filter
How To Start a YouTube Channel – Beginner’s Guide to YouTube
https://youtu.be/XpopyNZKYKw
Get Going
99% of the fear and cringe disappears after the first upload
Don’t tell friends and family and it’s like you never did it!
First 20 videos in this stage, then, choice 1
First Choice:
Breakup
Casual
<10-15 hours a week
Upload when you feel like it
For funsies, don’t expect serious, or really any growth
Serious
When you decide to get serious, that’s when you jump up to get good
Get Good
Decide you’re going to commit to youtube and take it seriously
Objective is to make videos better and better videos
Two ways to get good
quantity
quality
Most people start with quantity and then try to improve videos by 1% at a time
after about 20-30 videos on get going, you gotta do another around 50 videos to get through getting good
Factors
Title
Thumbnail
Hook
Personality
Camera Presence
Editing
Music
Sound Design
Writing
Structure
Branding
Good can be intrinsic or extrinsic
Are you satisfied with your work?
95% never pass the cringe test
Cringe Test: “I watched your video” you cringe
Extrinsic: Does the audience like it? Is it effective?
Billion Dollar Formula
People Click
People Watch
You need to commit to some level of upload consistency
After another 50 videos of actively trying to get good, ~80 videos total, Choice 2
Choice 2
Hobby or Business?
Money or Fun?
Yourself or Others?
If you don’t want to monetize your passion, move carefully
Get Smart
Workflow
Strategize
Goals
What are your actual goals?
What does the ideal channel look like 1 year or 3 years from now?
Plans are useless but planning is indispensable
Niche
Target Audience
Competitive Analysis
Watch everyone else’s stuff, analyze their strengths and weaknesses
Escape Competition through Authenticity
Competitive Advantage
Planning
QUARTERLY PLANNING
Pivoting
How to know when you’re failing and should do something else
Systemize
Once you know your strategy, Systemize it
Read The E Myth Revisited
Cashflow
Value
Products
Outflow
Hiring
Management
If I Were Starting A YouTube Channel In 2022, This is What I’d Do (7 Steps)
https://youtu.be/aBUcO_wAf08
Youtube is a SEQUENCE, not a bag of tricks
Sequence
1. Break Barriers
Just go make like 5 videos, don’t study, don’t fret the logo, just start doing shit and upload it like an animal
This is what stops people, paralysis analysis
2. Idea Direction
Now that you have some raw material to work with,
Dial it in and figure out exactly what your channel is going to be
Analyze others, what they do, and how they succeed, and
Analyze dead channels and figure out why they failed
Lots of people spend a lot of time testing out different ways of making videos, and this confuses the algorithm
Let the algorithm know all at once what type of channel you have so it can work for you
Contains a system for creating ideas that are successful
3. Core Skillset
The foundation that plays through the rest of the phases
Don’t struggle because you haven’t figured out the core
Publish at least 20 videos while developing the core skillset, before transitioning
If one of these core skills is missing, you’ll get punished for it later on
This is the time to get really good at understanding how the YouTube algorithm works
Also the time to get really good at body language and on-camera presence
You need to be interesting and own the space on camera
The better you are, the more interesting the videos are, inherently
Completely immerse yourself in the space, and then get good at coming up with good video ideas
4. Transition
Change how you measure your success to external factors, everything prior was internal
Learn how to make your videos such that people STAY on youtube
Get good at telling stories and leading people from video to video
Subscribeability – ongoing expectation of what to expect, as well as a reason to watch EVERY video.
The Call to Action skill is undervalued by creators but is a significant predictor of monetization potential
5. Replicate Formula
Figure out what works, systemize and replicate it
Most channels don’t monetize until this point, it’s not even worth worrying about
This is when you start understanding youtube analytics, because you have enough data to start making data-based decisions
Start implementing things to prevent “The Skip” people skipping ahead in your videos. Make them watch the entire thing
Leverage the youtube community feature
You should spend around 20 videos in each phase
6. Revenue Streams
Open the faucet and focus on your youtube channel full time
You should more than one revenue stream from your youtube channel. At least 3 really
Info Product
Sponsorship
Affilliates
Patreon
Build out one at a time. Build it strong before moving on
Get really good at asking for money (evolution of the call to action)
7. Build Authority
Build channel reach, build small contents
Deep Dive and Analysis
Expand Channel Audience now that you have a name
Do good collabs
Show up on places outside of Youtube
This is when people will start reaching out to YOU
3 critical success factor
time
strategy
skillset
Can I use my phone as a feed-thru camera to my computer via USB-C?
Installed DroidCam from Dev47Apps and OBS
Shit force restarted my computer for HD mode
Intro Video
!!!! Cringe
Recorded. Phone audio makes my voice sound better than my headset. whoops
one take not doing it again
Intro Video Script
New Org
File Schema
Root
Games
Minecraft
Lab
CAD
KiCAD
Projects
ex_Project
R0
Schematic
PCB
R1
R2
FreeCAD
Projects
ex_Project
R0
STL
CAD File
R1
R2
LTSpice
Projects
ex_Project
R0
Schematic
Sim File
R1
R2
VSCode
Projects
ex_Project
ex_Project.c
REPO
ex_Project2
ex_Project2.c
REPO
Ledger
Lab Ledger
Lab Ledger
Reference
Project
Date
Quantity
Unit Price
Total Price
Part Page
April 2022
Reference
Project
Date
Quantity
Unit Price
Total Price
Part Page
May 2022
Reference
Project
Date
Quantity
Unit Price
Total Price
Part Page
Project BOMs
ex_Project BOM
Media
Docs
Project Media
3D Printer
GCode
STL
Misc
Firmware
Calibration
Config
Projects
ex_Project
ex_Project Media
Design Sketches
Pictures
Notes
ex_Project 3DP
ex_Project KiCAD
ex_Project LTSpice
ex_Project FreeCAD
ex_Project Code
ex_Project Reference Docs
ex_Project BOM
TreeSheets
2022
Daily Journaling
Lab
Lab/Project Documentation
LAB CORE
Sprint Log
Project Log
Research & References
Notes
Sprint Log
finished only
Project Log
finished only
Pics
Sprint Gallery
finished only
Project Gallery
finished only
Sprints
Library
Library Sheet
Sketch
Replaces Weekend
Moon
Not sure I need this?
Replace with References in LAB CORE
Backup Schedule
Root on Dropbox
Backup Weekly on Sunday to HDD
Lab Schema
TreeSheets
LAB CORE
Sprint Log
Project Log
Research & References
Sprint #
Sprint #-1
Sprint #
Overview
Sprint Objectives
Timeline
Future Project List
Projects
Project1
thingy 1
thingaroo
Project2
me complaining
Research & References
RR1
old cad tutorial
future resource list
notes from a youtube video
RR2
active research
me studying the moon
extended notes on crickets
Open
Brainstorming
more of me complaining, outside the boundaries
YouTube
Video Planning?
End of Sprint
Extract Sprint # into LAB CORE/Sprints
Extract Research Notes into LAB CORE/RR
Extract Project Specific Notes into Master Project TS File
Extract Sprint # Notes
Extract Pics
Collect Pics into Lab Folder on Phone
Upload to Google Drive
Download, Compress with BIRME
Download, Upload to sprint page
Extract Pics into specific Project Media Folders
Do I work out of the Projects/ex_Project folder, and then clone files over to individual CADs/Media, or vv?
I think the former works better
Some non-formalized messing around can exist in the CAD’s folder
CADs
KiCAD
Projects
ex_Project
Other
messin-around1
Keep it organized
File Management -.-
Project Version Control – Github
What can I upload to github? Everything? Just code? TreeSheets renders?
Can’t you git anything on up?
Yes you can. I just took a quick mockup of the completed project files for the synth and uploaded them to a private repo. I can absolutely host every type of file necessary to fully document the project, including the TreeSheets. This is a powerful project finisher/version controller
Brain tired, taking a break
Slowly creating a veritable second brain
Needs to be organized, robust, accessible, and backed up securely
Setting up VSCode
Cringe!
So much to write down
Keyboard Shortcuts
Open Command Pallette
CTRL+SHIFT+P
Reload Window
CTRL+R
PIP commands
pip install xxx
pip uninstall xxx
pip list
python -m pip install –upgrade pip
Python PATH and App Execution Alias
For when python is installed but it can’t find itself
https://itsmycode.com/python-was-not-found-run-without-arguments-to-install-from-the-microsoft-store-or-disable-this-shortcut-from-settings-manage-app-execution-aliases/
PlatformIO Documentation
https://docs.platformio.org/en/latest/what-is-platformio.html
PlatformIO Tutorial
https://youtu.be/JmvMvIphMnY
PlatformIO Tabs
Home
Projects
Project Structure
Platformio.ini
change baudrate here from default value by adding
monitor_baud = 115200
Inspect
inspect individual projects
determine environment
amount of memory they’re running
Libraries
Library manager
Boards
List of boards PIO can support
Platforms
allows you to work with different platforms, including Atmel AVR
Devices
lists devices attached to the computer
Mega Lights 2
Note
Finally got them working
two channels, individually addressed, with my arbitrary control over them
Now a question of, how do I take notes on, and store code and code fragments and pseudocode in treesheets?
Anyway, here’s the working twinsig.ino
twinsig.ino
#include <Adafruit_NeoPixel.h>
#define PIN1 9
#define PIN2 10
#define UPPIXELS 58
#define DOWNPIXELS 43
#define DELAYVAL 50
Adafruit_NeoPixel upline(UPPIXELS, PIN1, NEO_GRBW + NEO_KHZ800);
Adafruit_NeoPixel downline(DOWNPIXELS, PIN2, NEO_GRBW + NEO_KHZ800);
void setup()
{
upline.begin();
downline.begin();
upline.show();
downline.show();
}
void loop()
{
// upline.clear();
//downline.clear();
for(int i=0; i<UPPIXELS/2; i++)
{
upline.setPixelColor(UPPIXELS/2+i, upline.Color(0,0,255,255));
upline.setPixelColor(UPPIXELS/2-1-i, upline.Color(0,0,255,255));
upline.show();
if (i < DOWNPIXELS/2+1)
{
downline.setPixelColor(DOWNPIXELS/2+i, downline.Color(0,0,255,255));
downline.setPixelColor(DOWNPIXELS/2-i, downline.Color(0,0,255,255));
downline.show();
}
delay(DELAYVAL);
}
for (uint32_t firstPixelHue = 0 ; firstPixelHue >= 0 ; firstPixelHue += 256 )
{
for (int i=0 ; i < UPPIXELS ; i++)
{
uint32_t pixelHue = firstPixelHue + (i * 65536L / UPPIXELS);
upline.setPixelColor(i, upline.gamma32(upline.ColorHSV(pixelHue, 255, 255)));
if(firstPixelHue>65536) {firstPixelHue=0;}
}
upline.show();
delay(5);
}
}
That’s kinda funny the way it blocks it out. I could probably change the way I format the code to make it transfer in and out of treesheets better
Pushing it into, and then pulling it out of TreeSheets also eliminates a huge amount of unnecessary spacing…. There are ramifications here.
Software
Adafruit Library
So the main problem was just declaring the instantiation of the Adafruit_NeoPixel object. It requires a number of pixels, a pin, the LED type, and the frequency.
Specifically, I needed to declare it as NEO_GRBW
I did notice that because the lower desk has 43 lights, and the upper has 58, that means i have to code the upper half for an even number and the lower half for an odd number
for(int i=0; i<UPPIXELS/2; i++)
{
upline.setPixelColor(UPPIXELS/2+i, upline.Color(0,0,0,255));
upline.setPixelColor(UPPIXELS/2-1-i, upline.Color(0,0,255,255));
upline.show();
if (i < DOWNPIXELS/2+1)
{
downline.setPixelColor(DOWNPIXELS/2+i, downline.Color(0,0,255,255));
downline.setPixelColor(DOWNPIXELS/2-i, downline.Color(0,0,255,255));
downline.show();
}
delay(200);
}
Void Setup
strip.begin();
Starts up the strip, mandatory
strip.show();
Renders current strip output, useful during setup to render an empty array
strip.setBrightness(n)
0-255, sets default brightness for all colors unspecified.
If you don’t use the HSV and define a color tuple, this will apply
Void Loop
Functions
strip.fill([colortuple])
strip.setPixelColor(i, Color(r,g,b,w))
Sets the pixel color.
Note you can’t use capital S in set
If R=G=B, then it’ll render white
But this white will be a classic RGB white, so it’ll look blue
It draws more power than necessary and is prone to the highest voltage drop, and thus redshift
One trick to make the default 0,0,0,W colder is to run 0,0,B,W. Works great, and voltage drop doesn’t seem to be a huge issue
strip.show()
Renders the output
strip.ColorHSV(H,S,V)
hue, saturation, value
this function’s output acts as the color tuple. It just converts the HSV inputs into an RGB output.
It takes a hue value of 0-65536. It’s not strict though, it’ll just roll over.
True Red is in the dead-center of this range
Saturation and Value(aka Brightness) both range 0-255
strip.gamma8([colortuple])
strip.gamma32([colortuple])
Takes in a color tuple and gamma/brightness corrects it. It generally makes animations that scale brightness smoother
Animation Structures
colorWipe
void colorWipe (uint32_t color, int wait)
{
for(int i=0; i<NUMPIXELS; i++)
{
pixels.setPixelColor(i, color);
pixels.show();
delay(wait);
}
}
whiteOverRainbow
int snakeLength = 10;
int snakeSpeed = 20;
int headPos = snakeLength – 1;
int tailPos = 0;
uint32_t lastTime = millis();
uint32_t firstPixelHue = 0;
void setup()
{
upline.begin();
upline.show();
}
void loop()
{
if(snakeLength >= UPPIXELS) {snakeLength = UPPIXELS – 1;}
for(int i=0 ; i<UPPIXELS ; i++)
{
if ( ((i>=tailPos)&&(i<=headPos)) || ((tailPos>headPos)&&((i>=tailPos)||(i<=headPos))) )
{
upline.setPixelColor(i, upline.Color(0,0,0,255));
}
else
{
int pixelHue = firstPixelHue + (i*65536L/UPPIXELS);
upline.setPixelColor(i, upline.gamma32(upline.ColorHSV(pixelHue,255,255)));
}
}
upline.show();
firstPixelHue += 40;
if((millis() – lastTime) > snakeSpeed)
{
if(++headPos >= UPPIXELS) {headPos = 0;}
if(++tailPos >= UPPIXELS) {tailPos = 0;}
lastTime = millis();
}
rainbowFade
for (uint32_t firstPixelHue = 0 ; firstPixelHue >= 0 ; firstPixelHue += 256 )
{
for (int i=0 ; i < UPPIXELS ; i++)
{
uint32_t pixelHue = firstPixelHue + (i * 65536L / UPPIXELS);
upline.setPixelColor(i, upline.gamma32(upline.ColorHSV(pixelHue, 255, 255)));
if(firstPixelHue>65536) {firstPixelHue=0;}
}
upline.show();
delay(5);
}
stripFlare
for(int k=0 ; k<256 ; k++) //pulse filler
{
pixels.fill(pixels.Color(0,0,0,W);
pixels.show();
delay(10);
}
for(int k=255 ; k>=0 ; k– ) //pulse drainer
{
pixels.fill(pixels.Color(0,0,0,W);
pixels.show();
delay(10);
}
Hardware
There was an issue with the lower front strip glitching out, shorting, and turning off the other strips as well as itself
I figured out it was because the bridge clamps were weak and the copper was dented in the strips
I fixed the issue by just soldering the two together and then clamping it closed.
I also centered the lights more perfectly.
I used some alligator clips and tested the secondary injection of the 5V onto the far side of the front bottom strip and it improved voltage drop noticeably, but not enough to justify adding that many more wires to the system.
I got the dual signals working, and it was so easy, I’m pretty sure I could get all 4 strips working independently on a single microcontroller
Next Steps
The next major step is to get a twin-tailed pulse to jump from the center
Once I get that moving, I’d like to build it into an interrupt routine
If I can independently animate/set the background from the interrupt pulse in an elegant way, then I’m set
After that, it’ll be time to set up the ESP32 and Breadnet/MQTT
That way I can trigger the ISR over MQTT using my phone, a keyboard stroke, etc.
I also want to set up a useful interface for specifying a specific position in the array and overriding the pattern with a static light at a higher priority
It seems like there might need to be multiple priority levels and some sort of memory state for the array of tuples that can be stored, pulled, reverted, edited, etc.
From there I can execute on some other ideas I have:
Brightness throb matched to song tempo
Heartbeat matched Center Pulse
Specific Status Indicator lights
Binary Clock
With Specific Status Indicator Lights (SSILs) the desk can actually communicate a large amount of information with varying priorities about other projects/sensors/devices throughout the house/network
Not sure how useful that could be, but a starting point would be confirming garage status or something