
K: 5/23/2022 – 6/5/2022
L: 6/6/2022 – 6/19/2022
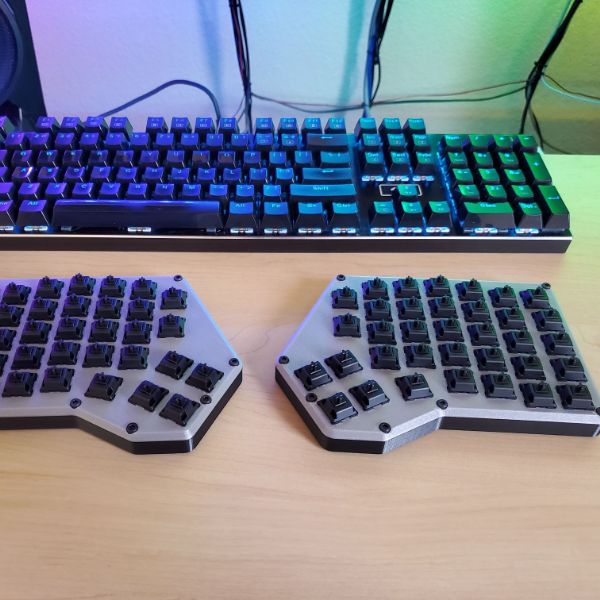
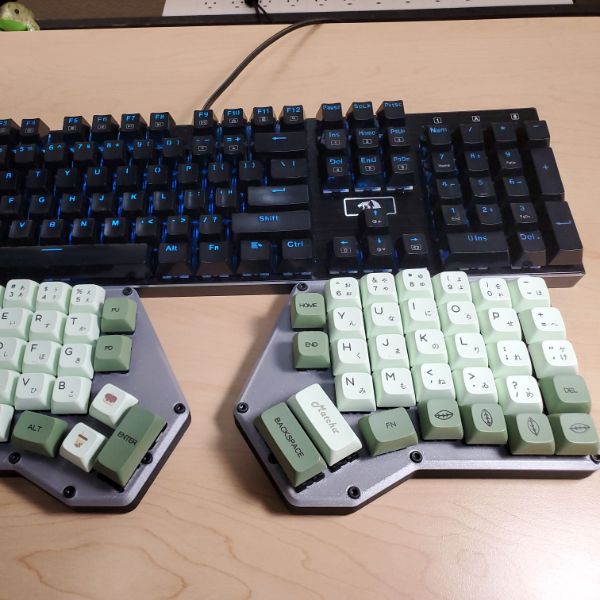
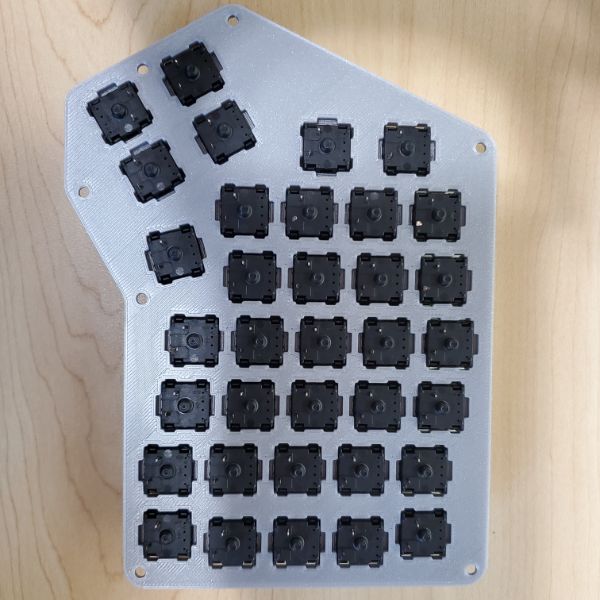
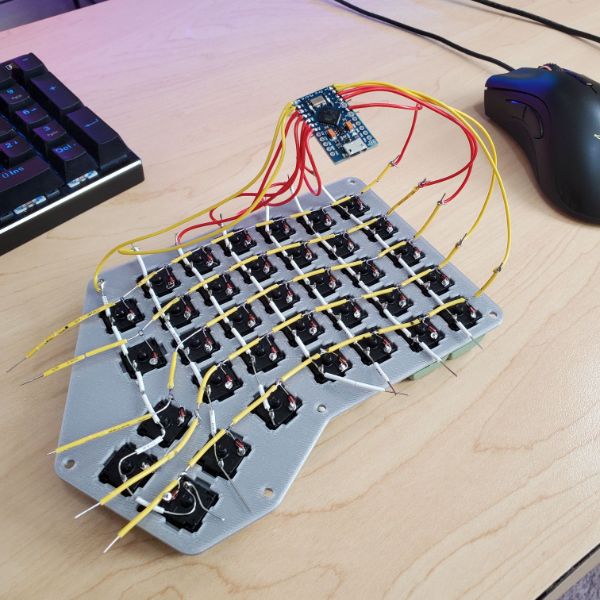
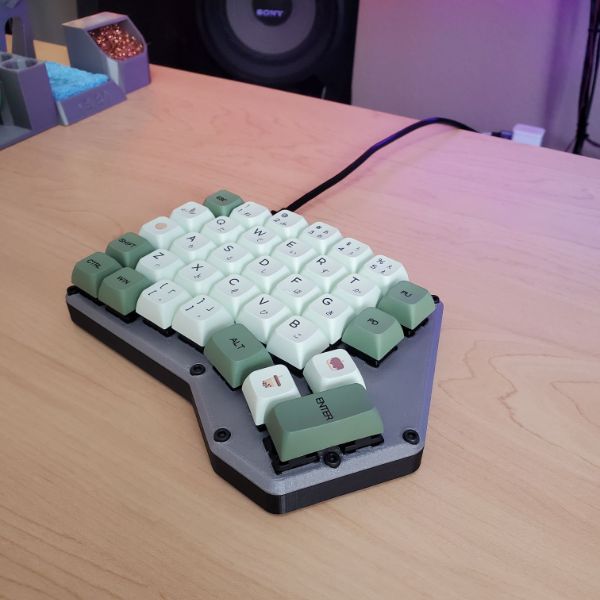
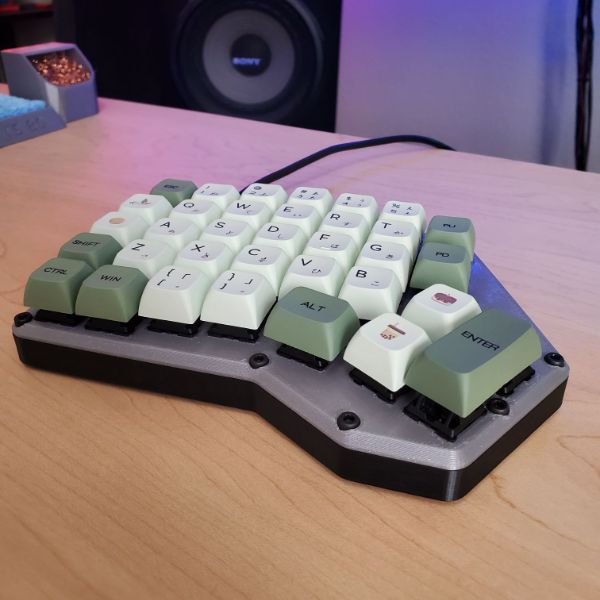
Summary: Now on Hiatus! I’m moving to Washington so lab time has decreased considerably and will stay down for the next 2 months at least. I printed out a Redox Mechanical Keyboard, put in some black switches, ordered some Matcha Keycaps, and then hand-wired and soldered together the left side. I put in an Arduino Pro Micro, flashed the firmware, and it worked first try. Pretty gratifying!
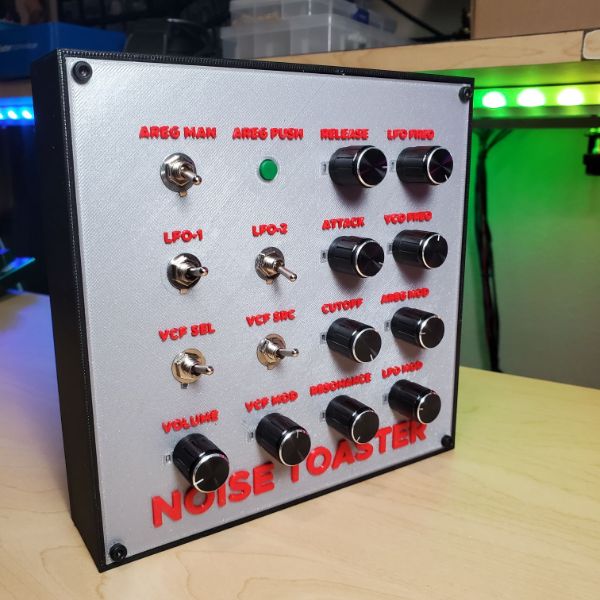
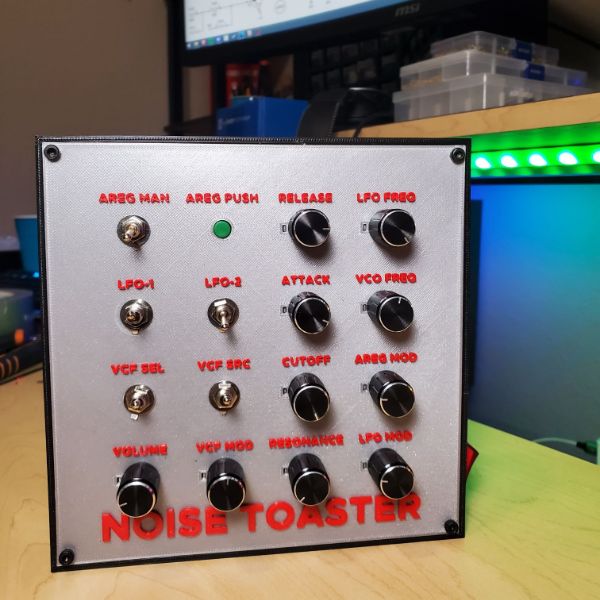
I also built another Noise Toaster with the new printed color change text and a new design that uses bolts instead of a slide mechanism. It looks and feels way better. I recorded a timelapse of the prints, and recorded/streamed the part picking, soldering, and testing process. That’s about the extent of what I’ve got going on right now. Once I get set up in the new place I’ll handwire the second half of the keyboard, make another synth to give out to itvlo, and then move onto some new stuff. I also made a new soldering iron station but I don’t have any pictures of it. It’s very nice though.
I have been having more new project ideas and have sketched a few out recently too. No shortage of stuff to work on once we’re back.


Komodo/Lizard
Komodo Modo
Thaw Update
Smash Briefcase
Materials Rough
S1-new switch
Briefcase
80
LCD Screen
66
GCC Adapter
40
Battery
30
Misc Backend
HDMI Ribbon Cabling
Simple BMS/PSU
Speaker Wiring
Foam/Obscura
Filament
Nuts/Bolts/Screws
Power Cables
Extension Cord
60
Switch Speaker
20
Bluetooth Speaker
30
Nintendo Switch
300
2x GCC
92
Total
718
S1-existing switch, no controllers, no speaker
Briefcase
80
LCD Screen
66
Switch Dock
60
GCC Adapter
40
Battery
30
Misc Backend
HDMI Ribbon Cabling
Simple BMS/PSU
Speaker Wiring
Foam/Obscura
Filament
Nuts/Bolts/Screws
Power Cables
Extension Cord
60
Switch Speaker
20
Bluetooth Speaker
30
Total
386
Layout
Briefcase
Enough depth to hold monitor, monitor framing, and obscure some cabling
Plus Speakers and some LEDs probably
Enough bottom depth to hold the switch dock, battery, gcc adapter, and 2 gccs
$80
18 x 14.25 x 5″
https://www.amazon.com/Vaultz-Locking-Laptop-Black-VZ01216/dp/B00153BIMA/ref=pd_rhf_se_s_pd_sbs_rvi_sccl_2_1/147-7784981-8143038?pd_rd_w=TBjYZ&content-id=amzn1.sym.80dc3982-f1a9-4e70-830e-7a37a0660538&pf_rd_p=80dc3982-f1a9-4e70-830e-7a37a0660538&pf_rd_r=DW4XXGQ0H2DC245S6J6G&pd_rd_wg=Tsg9W&pd_rd_r=313665bd-5c1f-4e1a-a037-d517cb9cd5a3&pd_rd_i=B00153BIMA&psc=1
LCD Screen
1080p
15.6″
$66
https://www.amazon.com/BRIGHTFOCAL-A515-51-58HD-Non-Touch-WUXGASlim-Replacement/dp/B07NQP46SR/ref=sr_1_14?crid=1TVMFSPDBE8TP&keywords=1080p+replacement+lcd&qid=1655063118&sprefix=1080p+replacement+lcd%2Caps%2C127&sr=8-14
Monitor Frame/Mount
3D Printed
Embedded into the Briefcase
Switch Dock
Official Nintendo Switch Dock
$140
https://www.amazon.com/Nintendo-Switch-Dock-Set/dp/B06ZZ6FGGL/ref=sr_1_6?crid=12MRGYQDUL4QV&keywords=nintendo+switch+dock&qid=1655064883&sprefix=nintendo+switch+do%2Caps%2C166&sr=8-6
Nintendo Store
$60
https://www.nintendo.com/store/products/dock/
$75
Genki Dock
Outputs 30W of USB-C power for the switch
https://www.genkithings.com/products/covert-dock
GCC Adapter
No off brand shit
$40
Nintendo branded GCC adapter from Japan
https://www.amazon.com/Nintendo-GameCube-Controller-Adapter-without-English/dp/B07HC15QNZ/ref=sr_1_4?crid=2A90GTI9XPW06&keywords=nintendo+switch+gamecube+adapter&qid=1655064722&sprefix=nintend+%2Caps%2C149&sr=8-4
Power Wiring
Nintendo Switch
$300
https://www.amazon.com/Nintendo-Switch-Neon-Blue-Joy%E2%80%91/dp/B07VGRJDFY/ref=sr_1_3?crid=3IGB438770N2O&keywords=nintendo+switch&qid=1655066234&sprefix=nintendo+switc%2Caps%2C162&sr=8-3
Audio
Speakers for Smash, hardwired
Either attached via the Aux Port or attached via the HDMI ribbon cable splice
$20
Separate from the switch speakers, another Bluetooth Speaker
for player spotify
Permanently wired into the battery grid as well so it never needs to charge
Would need a power switch for it though
$30
Control Wiring
HDMI to Ribbon Cable
Around $15
https://www.amazon.com/Arducam-Extension-Module-Raspberry-Specific/dp/B06XDNBM63/ref=sr_1_4?crid=10VRVPR43WUUP&keywords=ribbon+cable+to+hdmi&qid=1655064371&sprefix=ribbon+cable+to+hdmi%2Caps%2C131&sr=8-4
GCC Storage x2
Like the adapter, make sure it’s nintendo brand
no off brand shit
This exact listing
$46
https://www.amazon.com/Nintendo-Controller-Super-Smash-Bros-switch/dp/B07HC2F97Q/ref=sr_1_3?crid=14E305J3U7NQP&keywords=nintendo+gamecube+controller&qid=1655064778&sprefix=nintendo+gamecube+controlle%2Caps%2C131&sr=8-3
Battery?
DC Battery would have to match power characteristics for both the switch and the monitor
Idk the tolerance level of the switch power converter, but i know the screen and the switch would both take DC, right?
Laptop battery should be fine in that case, since the laptop runs the screen and a computer already then that should work
Power Consumption of Switch
Lithium-ion battery/4310mAh
TV mode
Playing a game: Approx. 7W
Watching a video: Approx. 6W
On the main menu: Approx. 3W
Sleep mode: Approx. 0.3W
Power off: Approx. 0.3W
Monitor 15.6″ LCD/LED: Around or Under 20W
Laptop Battery?
$20-50
Around 5000mAh
Power draw expected around 30W for switch and 20-100W for screen
https://www.amazon.com/Replacement-593553-001-Presario-Pavilion-DV3-4000/dp/B073VJVH1N/ref=sr_1_3?keywords=laptop+battery+replacement&qid=1655064450&sprefix=Laptop+battery+re%2Caps%2C121&sr=8-3
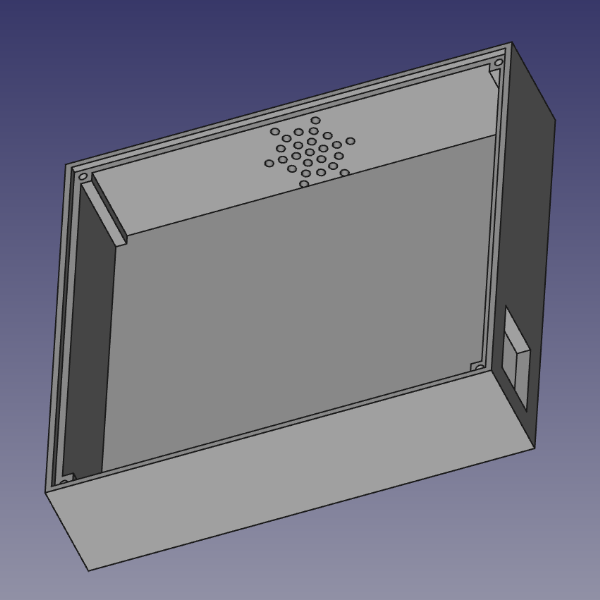
Noise Toaster
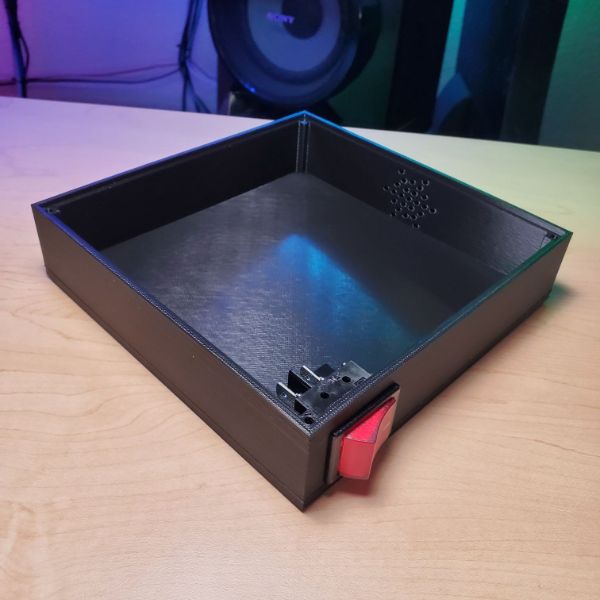
Casing
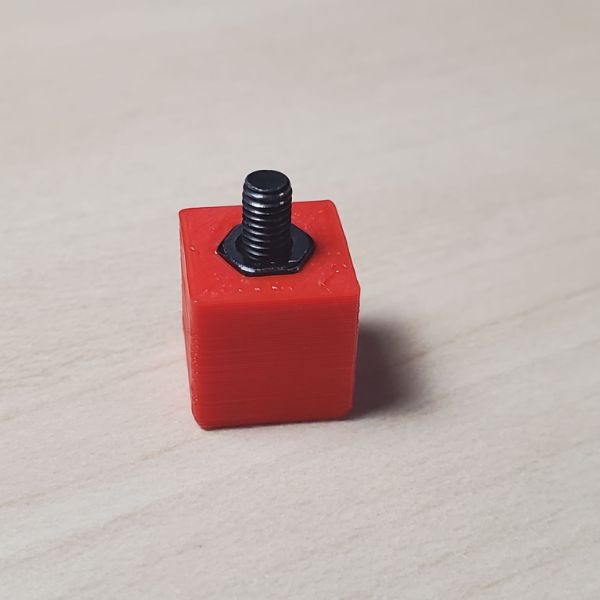
Decided I want to go with a bolt-on design for the front panel instead
It’s mechanically simpler for everyone involved (me and the user)
It means that if someone wants to get into the case, either to change the 9V or to troubleshoot wiring, they can do that simply and easily
Without having to rely on a sliding panel
This also means that The sliding panel doesn’t exist, and can’t possibly fall away, get damaged, or otherwise interfere with the function/safety/aesthetic of the box
I will need to chamber the harsh edges of the box when I do the final print as well
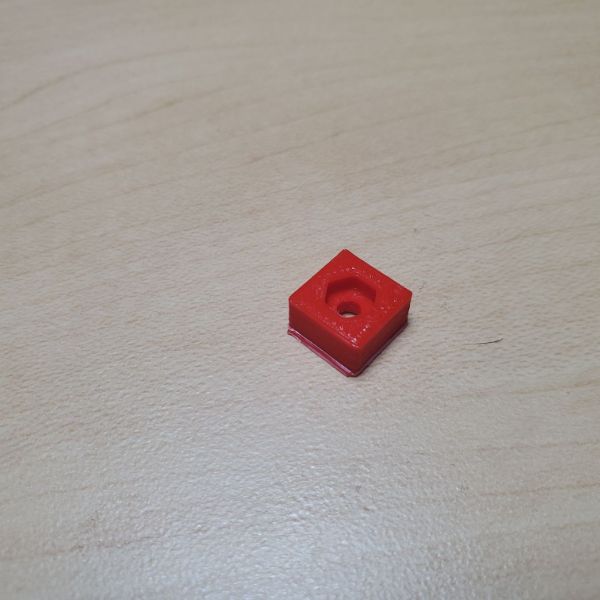
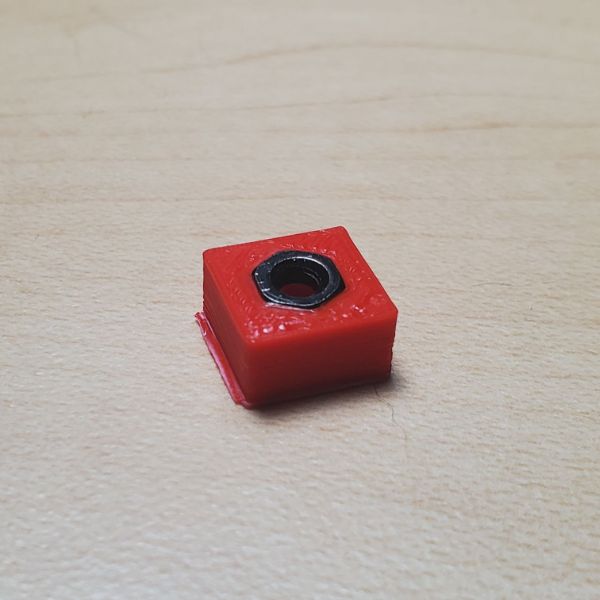
Currently in the process of designing recessed pockets that can hold an M3 nut and bolt without bulging out and scuffing the outer profile of the box
Once that’s done, I need to probably reprint the Synth Front Panel with the holes, and make sure it’s thick enough to handle a slight pocket for the exposed nut, or maybe not, maybe it can just poke out, who cares really. As long as it’s not scratching whatever surface its on when it’s on its back that’s fine with me
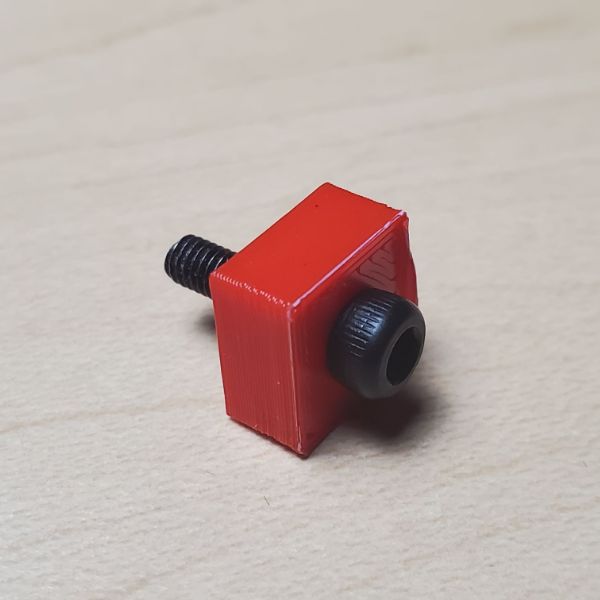
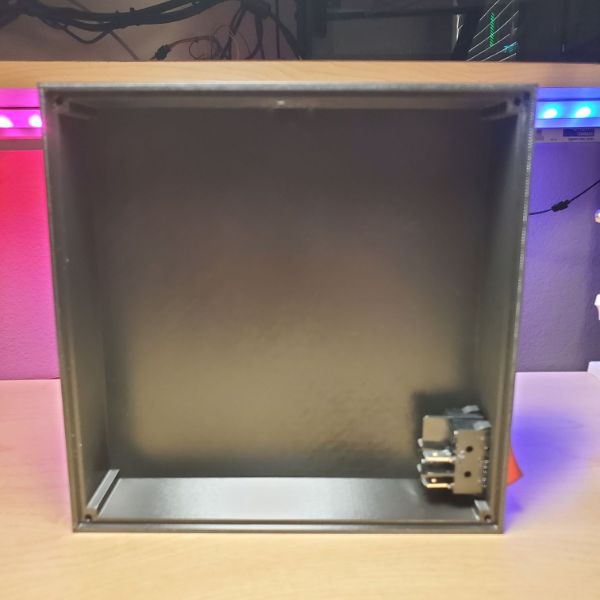
The depth of the box will now be limited by the length of the M3s however
The ones I have are only 20mm, which is too small
Simple Solution, Get longer M3s
30/35/40/45/50mm SS M3 (200pcs) for 12.00 on amazon
They’re silver so they might match the galaxy silver filament I’m using. If not, nbd
Old box was 40mm so that should solve that problem pretty nicely
Gonna stick with hot glue for mounting the PCB. nobody needs to see that, and this is a good use case for the powers of Hot Glue
I should look into that UV Curing Epoxy though, I heard it was (super good)
I also need to test printing for the Power Switch, and Make sure its obnoxiously large profile fits cooperatively into the case
So Current Steps to Completion are
Purchase more Connectors/Pots/Switches
Finish SOP Dimensions for M3s on my Printer
Test pocket depth on a 2.5mm slab for front panel
Add Pockets to Front Panel
Redesign Body with Pocket Frames, Power Switch, and Chamfers
Set up 3D Printing Timelapse
Print Front Panel [R]
Print Body [R]
Assemble without Electronics
Confirm it’s good
Setup Soldering Recording Timelapse
Assemble Electronics [R]
Test Synth Board
Hot Glue Functional Synth Board to Case
Mount Front Panel Interfaces
Button it up
Take Pictures [R]
Active Projects & Objectives
Noise Toaster
Design New Case
Assemble New Board
Record Video
Lightsbox
Try not to break it or burn the house down
Start Designing a PCB for it
Start Designing a new box for it
Solder Station
Finish Making design changes and print
Put it all together and start using it
Breadnet
Harden
Project Notes
Noise Toaster
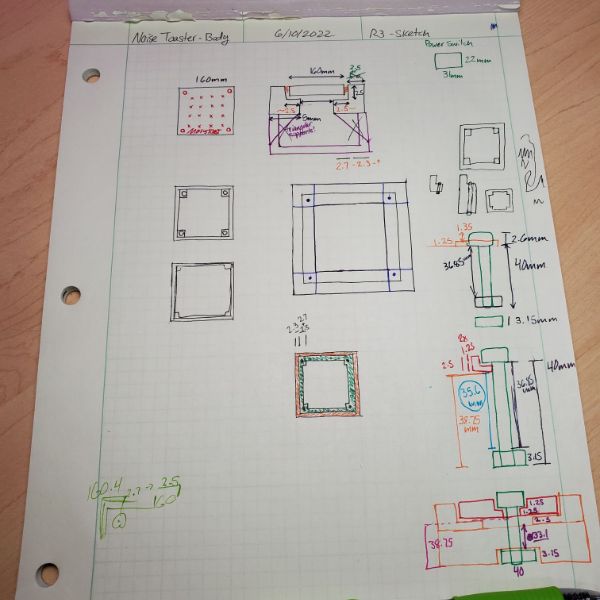
New Body Design
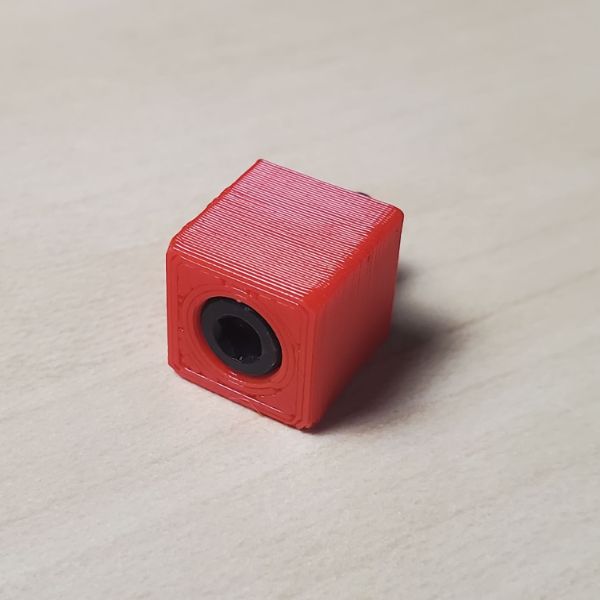
Mounting Holes
The length of an M3 bolt refers to the length of the shaft, not the absolute length of the piece
M3
Shaft
2.95mm
Hex Nut
5.55mm Hex OD
2.6mm Depth
Bolt Head
5.60mm Circ OD
3.15mm Depth
Previous case has a depth of 40mm inclusive
Designing around a 40mm M3 bolt that runs through the entire body of the print
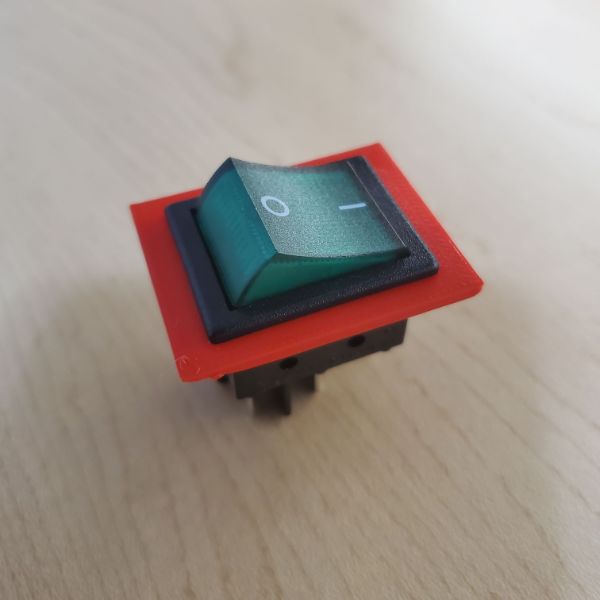
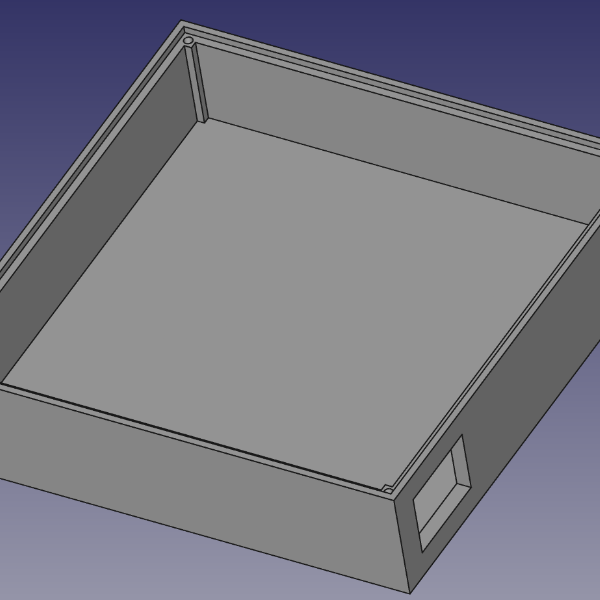
Power Switch
Speaker
Front Panel Design
Front Panel should now rest on top of a lip from a slightly smaller square
The front panel dimensions are 160x160mm
2.5mm lip on all sides means an internal dimension of
155x155mm
Which is attached to a
Parts Ordering
Casing
Carve a hole for the switch dimensions
Design a slide panel that slots into the corner of two walls for the 9V battery
Use the 9V battery holder, extend it to match the length of the battery, and give it a bottom so the battery rests flush in place
Leave the battery head facing out of the casing with enough room for the connector, and enough room for the slide
Test notched slides until you get a good method for them
Power Switch Measurement
rectangular hole inside a 2.5mm thick slab
Measured Dimensions:
26.94mm
Snap Tabs: ~1.4mm
21.30mm
Test Dimensions
29
22
29×22
5mm buffer on all sides
39×32 print area
Too Small
Final Dimensions
41x32mm print area
31x22mm switch gap
Slide Panel Tests
Vertical Printed
2.5 thickness slide
2.5 wide gap
doesn’t fit, spreads the frame
2.75
fits perfectly. pretty satisfying, but there’s not enough friction/grip. the slide can shift around in place
2.625
This is the compromise. It still slides with ease but there’s enough friction, and it doesn’t spread the frame
Add ONE EIGHTH of a millimeter for slides
Horizontal Printed
I have to rerun these tests because the overhang creates issues
2.625
isn’t enough
2.75
Front Panel Slide Rails
Front Panel Dimensions
160mm Across
160mm Deep
2.5mm Thick
Slide Rail Dimensions
165mm x 165mm
7.5mm tall with a 2.625 tall notched vertically centered, cutting in 2.5/5mm deep
Front Panel M3 Bolt Check
Measurements
M3 Bolt OD
5.38mm
Hexagon
>
5.55m Hexagon Diameter
M3 Bolt ID
~2.6-2.75 mm?
Check Spec
Shaft/Thread Diameter
Consistently measures around
2.93, 2.94mm
Consistent with M3 (3mm)
Will make a snug shaft of 2.90mm
Works, but inconveniently snug. Try 2.95
Bolt Head Height
3.04mm
>
3.15mm
Bolt Head OD
5.45mm
>
5.60mm (larger than hex)
M3
Shaft
2.95mm
Hex Nut
5.55mm Hex OD
6.41mm Hex OD
corner to corner
2.6mm Depth
Bolt Head
5.60mm Circ OD
midpoint to midpoint
3.15mm Depth
Front Panel Pocket Depth
Front Panel is only 2.5mm thick
I can print a small 2.5mm slab and have four pocketed corners of varying depths to see which works best
0.5
1.0
1.5
2.0
Those are really the only options
There might be an optimal of 1.25, so I’ll do that in the middle too
1.25 is the move
Or really it would be better to just do a strip instead
Solder Station
Tool Cart
The six holes for the additional irons are a little loose, I’d like to print them a little stiffer so they don’t wobble around. The rest of the holes are fine as is
I’m experimenting with adding a shaft coming outside the back that can act as an axel for the spool of solder wick. printing out some 8mm shafts and slots to see how they fit
I could drill a hole and bolt it in, but I think a more elegant solution would be to print my own shaft and cap
Iron Holder
There’s a little too much wobble in the iron holder itself
To fix that though I would need to extrude some wider diameter arc at a plane, which might be difficult. Otherwise it works great and it turns out the first cm or 2 of the metal isn’t hot. It shouldn’t really be dangerous or painful until the extended, thicker part of the shaft
I cut a sponge using a kitchen knife and it fits great. I’m thinking of hot glueing it, but I’m going to hold off on that until I do a reprint, since it looks like that’s where this is going
For the TS-80 logo, I’m thinking of padding that out of the picture and then adding an eein.info instead
I cannot get rid of the existing logo because of the way I import STLs and convert them into bodies in FreeCAD.
The shape is too complex and it lags my computer. I’m sure there’s a way but it’s not that big of a deal to me.
With that in mind I might just end up drilling the existing piece after all
Wool Pit
Cut the amount of copper wool I have in half and it’s the perfect amount to stuff in there
No other changes to make here
New Helping Hands
Got a new Helping Hands set. They are superior.
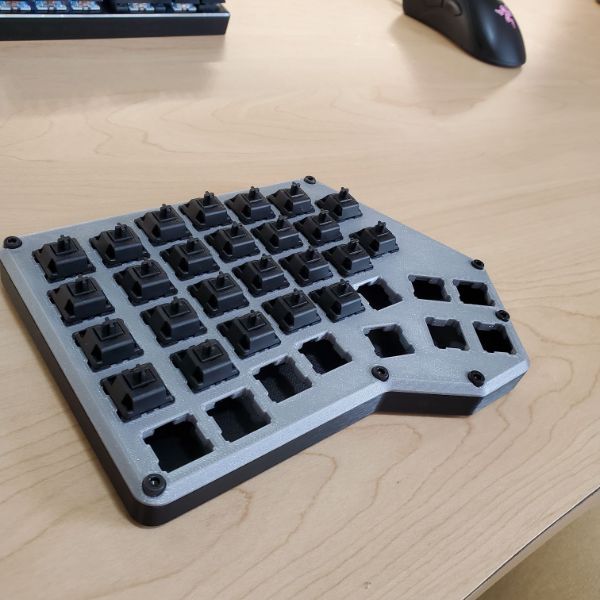
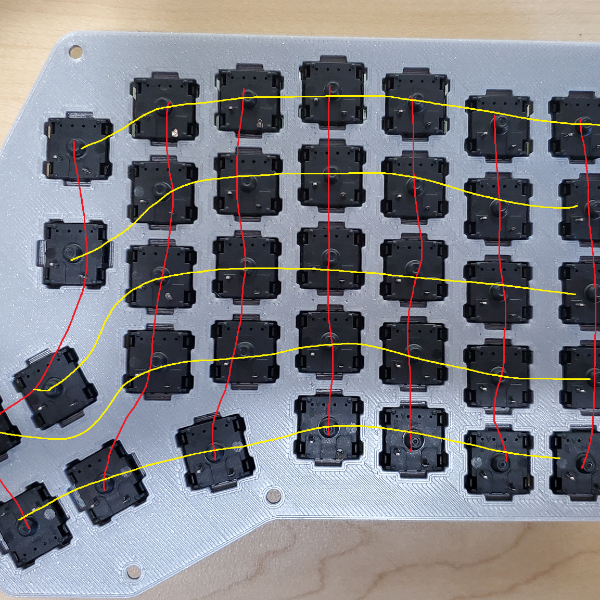
Mechanical Keyboard
Printed out both sides of a two-piece mechanical keyboard. It came out nicely and is pretty satisfying to handle.
Angel got me a pack of 120 black switches a while back and they don’t fit into my current keyboard but fit nicely into the printed frame
keycaps are arriving today, but I don’t have a microcontroller ready for it, nor have I really looked into the wiring yet.
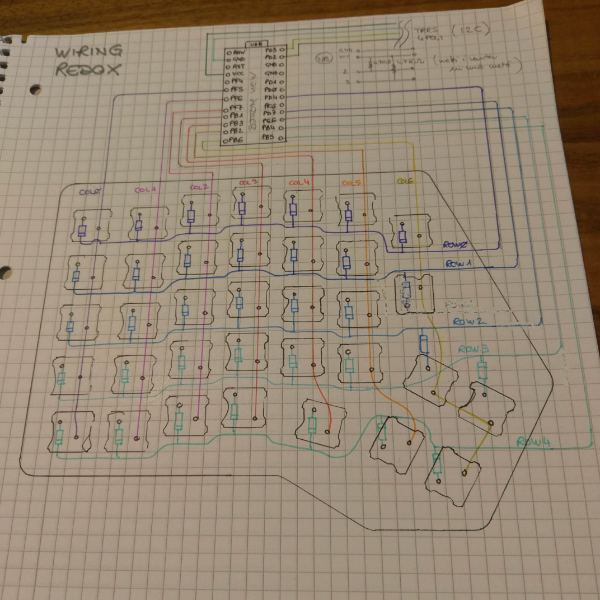
Resources
Wiring Guide+Other Resources
https://www.crackedthecode.co/a-complete-guide-to-building-a-hand-wired-keyboard/
https://geekhack.org/index.php?topic=87689.0
Teensy Official
https://www.pjrc.com/store/teensy.html
Redox Layout Official
https://thangs.com/designer/ZackFreedman/3d-model/Redox%20Handwire%20Mechanical%20Keyboard-10464
https://www.thingiverse.com/thing:2704567
QMK Official Wiring Guide
https://github.com/qmk/qmk_firmware/blob/master/docs/hand_wire.md
TRRS
https://www.cablechick.com.au/blog/understanding-trrs-and-audio-jacks/
Keyboard Test
Sam Sattler
Article
Table of Contents
Disclaimer
Global issues
World hunger
Air pollution
Is renewable energy the solution?
Renewable energy
Electric cars
Carbon capture
The biggest issue
Renewable energy’s secret ingredient
What actually are they?
Rare earth metals aren’t rare at all
Civilian use
Military application
Green energy
The supply issue
Destroying our a planet in order to save it
A plan to destroy the ocean
Asteroid mining
Why asteroid mining
Asteroid mining methods
TransAstra’s plan has its own issues, but the concept is generally solid. Their plan is to make a gas station in space both on the moon and in orbit around it so that consumer rockets can refill after spending the majority of their fuel leaving earth orbit.
The fuel comes from mining asteroids, but more specifically extracting volatiles from ice-laden asteroids. The unprocessed material gets sent back to the moon so it can get refined into fuel. but to move back to the station, these automated worker bee drones jettison water out the back as steam to produce the thrust.
Something your article doesn’t really address is incoming freshwater scarcity. water wars are real and if the water threatens to run dry people won’t care how much oil they burn. this is a more sensitive pain point you should look into more.
Along with that, as we move into space, we’re going to have the same issue. There are a finite number of asteroids, and a finite amount of ice in the solar system. If we push steam out the back of thousands and thousands of automated drones, we are permanently reducing the total amount of water we have access to. whether that water is used to quench thirst or is captured in lifeforms doesn’t matter, we lower our own scope.
turns out this is wrong. there’s far more water offplanet than on planet in the solar system
If we had better ionic thrusters we wouldn’t have to worry about wasting water, but it’s similar to the problem you describe with current renewable energy sources, they require obscure materials and manufacturing and don’t perform well
Space manufacturing
nitpicky, but the cost to orbit says it dropped 5000%. things can’t drop 5000%
did you mean it costs 1/5000th of what it did before? then say 99.98% price reduction
My plan for a better future
Nuclear energy a temporary solution
see fusion vs fission below
Asteroid mining effects
what’s more important, expanding into space, switching to renewable energy, or accelerating innovation? it seems like they all go hand in hand, but there are tradeoffs for prioritizing one over the other.
consider Mess Before Mars: if we don’t create a sustainable civilization-system before we go to mars, it won’t happen on mars either
offworld manufacturing means you should consider that 51% of all resource extraction and manufacturing will be done off-planet and shipped down. Many, many more things will be entering the planet than leaving.
Similarly, all planet’s atmospheres eventually thin out over time as gas expands into the vaccuum of space. There is a non-zero argument for releasing CO2 into the atmosphere in order to keep the air thick enough to breathe. It’s something we would have to do excessively to terraform a planet like mars
Carbon neutral energy
carbon isn’t the biggest issue
you’re kind of circling on the issue of free energy with this and the farm thing
it’s why people chase nuclear fusion, which you don’t really mention in the article. does your stance on nuclear as a long term energy solution account for the differences between fusion and fission?
if energy was “free” then we could just run carbon capture machines, extract the CO2 from the air and condense it back into gasoline. but energy won’t be free
even if we have nuclear fusion reactors that produce 100x the energy capacity we require, the logistics involved in distributing that energy mean that energy will never be free. in an abundant future, long-term, it’ll just be cheaper the closer you get to the source
Have you heard of solar power satellites? Solar power works much better in space and it’s possible to beam the collected energy back down to the surface from a satellite much like you would send a radio signal. Along this line is a Dyson Swarm/Sphere.
Reversing environmental damage
should develop further ideas about environmental damage/climate change
what we’ve done can’t necessarily be reversed. for one, this is a mass extinction event
second, there’s no way for modern civ to continue processing as much material and energy as we are without affecting the environment at large, even with 100% carbon neutral energy systems
the only remaining option is for us to start stewarding the environment ourselves. unfortunate but there won’t be much more “virgin land” moving forward
Solving world hunger
Farm idea doesn’t make sense
See SFIA
One large farm isn’t useful
Would it be monoculture? one crop? viral contagion wipes our the planet
centralized systems usually have singular points of failure too
what’s getting grown? livestock upcycles food into something more nutritious
if you could convert grass into steak, you would buy that machine
crickets
Closing thoughts